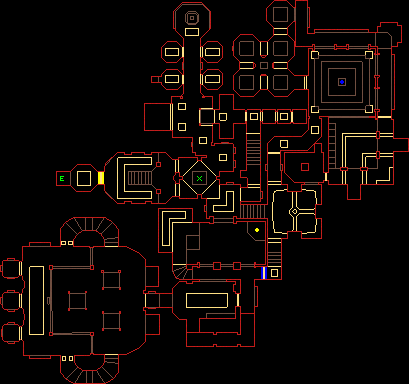
Portal:

The start of this map is pretty simple. There will only be a few zombie soldiers and bull demons that will menace you at first. To the SE of the start point are some stairs up. In the room at the top are a few more zombies and an imp near the blue key door to the south.
Blue Key:
To the left through the only other door is the room with the blue key. This area is much the same as map40 as you
will be attacked by several cacodemons while imps throw fireballs at you from the surrounding hallways. Back down
the hall and the battle should go the same way as it did before.
To the left again is the next door. Inside is a squad of soldiers. These guys all carry chainguns and shotguns though, so be careful. The wall switch in this area opens a teleport, and also triggers a teleporting imp ambush. The teleport takes you back to a hallway near the start.
Head left down the stairs to an empty hallway. When you get to the west end, hidden doors will open from both sides with a pair of hell knights waiting in ambush. The west end is a lift up to another area of the main floor. A wall switch to the left of the lift opens to the start area again. The strange wall directly in front of the lift is actually a secret door where you can collect the radar map and some hell potions. Down the hallway to the north are some cacodemons in cages. The switch at the end opens to reveal a rocket launcher. This also opens all the cages and teleports a few zombies into the hallway.
Be sure to collect all the goodies in the cages, including a backpack. One has a teleport to a new area of the map. The switch on the column in the room where you arrive lowers the blue key pedastle, so don't forget to activate that before proceeding. Through the door is a path back around the blue key room. There are several imps in along this walkway, and a pit with bull demons below. When you get about half-way around the pit, doors will open and allow another pair of hell knights to come after you again.
Making your way back around to the blue key, you will encounter a few more bull demons. When you pick up the blue key, you'll meet another of the new enemies. The Acid Demon resembles a bull demon, but moves much slower and spits acid as an attack. One blast of the double-barrel will take him out easily though.
Yellow key:
Through the blue key door, you'll run into a few zombie soldiers and see the yellow key on a raised platform. In the
room to the left are some more bull demons and a caged imp. Clear everything out, and save your game. The next area
can be really dangerous.
When you enter the room a bit, cacodemons will appear along with a nightmare cacodemon. It's best to try and time it so the door is just about to close, then run in and back out the door quickly. If you do this fast enough, then they will all be trapped inside and the nightmare caco will fight with the other two and destroy them. If you aren't quick enough, the nightmare caco will follow you out of the room and likely destroy you instead! Once the room is clear, head to the west end of the room where there is a lift down.
Also in this area is another secret area. The wall adjacent to the room with the cacodemons will lower so you can go around and collect the invisibility artifact from the cage where the imp was. Personally, I wait to collect this until the next area is initially cleared.
The room at the bottom of the lift contains several bull demons, and a couple of nightmare imps on high ledges. Rid this room of all occupants, then go back to collect the invisibility before heading up one of the stairways. The area at the top of the stairs will be safe until you get near the alien laser in the middle of the floor. At that point, bars will close the stairs down and a nasty team of lost souls and barons of hell will begin to appear from both sides trapping you in this U-shaped room with no exit.
I did fairly well by starting with the chaingun and double-barrel to concentrate on the lost souls first. Run past the slower moving barons after leading them to one side, then the other, switching to the rocket launcher when they are far enough away to fire at them safely. When that crew has been annihilated, mancubi will teleport to the three platforms in the center. Once they fall, the bars will open and a switch will rise. The three doors behind the switch will also open and release more acid demons. The switch lowers the platforms holding the yellow key.
As you head back towards the yellow key door, you will likely encounter a couple of roaming cacodemons that have teleported in. The platform in front of the yellow key door is also now being guarded by an arachnotron. Once he's out of the way, the enemies should all be gone. Grab the special laser key and step into the teleport to exit the map.
Back to Top / TC map index / Classic DOOM home page